
How to Choose the Right Flower Frog
How to Choose the Right Flower Frog
Choosing the right flower frog can make a significant difference in how easy it is to arrange flowers and how stable your final design feels. While flower frogs are simple tools, the type, size, and structure you choose will affect how stems are supported and how your arrangement develops over time.
For beginners, understanding a few key factors can make selecting a flower frog much more straightforward.
Start with Your Vase (Not the Frog)
One of the most common mistakes is choosing a flower frog before considering the container.
The size and shape of your vase determine:
how large the frog should be
whether it should sit inside or on top
how stems will be positioned
For example:
Wide, shallow bowls work best with low-profile frogs
Narrow vases may require smaller or integrated frog designs
Long containers benefit from elongated or multiple support points
Starting with the vase ensures the frog fits naturally into your arrangement.
Understand the Main Types of Flower Frogs
Different types of flower frogs offer different levels of support and control.
Cage or Grid Frogs
These provide evenly spaced openings and are often the easiest to use. They help guide stem placement and create balanced arrangements. Some cage frogs are flat and designed to sit at the top or rim of the vase. Our EcoFloral 3d printed flower frogs are domed and designed to sit internal to the vase, although they also can sit on top if secured to the rim. Another popular cage frog is the Holly Chapple Egg, which comes in 4 and 6 inch sizes.
Built-In Flower Frog Vases
These combine the frog and vase into one piece, simplifying the process and reducing setup. The vases are ready to be arranged in without additional supplies. They can be challenging to clean depending on the material. Our EcoFloral flower frogs and vases are dishwasher safe to ensure the longest use and cleanest vessel for flower stems.
Pin Frogs (Kenzan)
These use metal pins to hold stems and allow precise placement but require more control and practice. These are best for minimalist arrangements with lots of negative space and fewer stems. Harmony Harvest Farm offers a great selection of pin cups and holders for any vase you might use.
Glass Frogs
Glass frogs offer simple support and are often used for casual or decorative arrangements. They are translucent, which makes them great for glass vases or other see-through vessels.
Chicken Wire Cages
Another popular frog-like mechanic that many florists and flower arrangers use is a piece of chicken wire molded into a sphere-like shape. The benefits of a chicken wire frog is that you can tailor the size and shape to any vase. The downsides of using chicken wire include limited re-use (the wire will rust after a while), and it often has sharp edges from wire cutting which make shaping it more difficult.
Choose the Right Size
Size is one of the most important factors. Both the overall size and the size of the stem holes are important to consider when choosing a flower frog.
A frog that is too small:
won’t stabilize stems effectively
A frog that is too large:
may crowd the container
limits flexibility
Match the Frog to Your Arrangement Style
Different frogs support different styles of arranging.
Structured arrangements → grid or pin frogs
Natural, garden-style designs → grid or built-in frogs
Minimalist designs → pin or Kenzan style frogs
If you’re just starting out, grid-style frogs tend to offer the best balance between control and ease of use.
Consider Ease of Use and Maintenance
Reusable tools should be simple to clean and reuse.
Look for:
stable placement in the container
easy removal after arranging
materials that rinse clean easily and are dishwasher safe
Because flower frogs are reused over time, ease of maintenance is an important factor for long-term use.
Common Mistakes to Avoid
When choosing a flower frog, beginners often:
select a frog that is too small
choose the wrong type for their vase
expect foam-like rigidity
overlook how arrangement style affects frog choice
Understanding these factors early can make arranging much easier.
How This Connects to Foam-Free Arranging
Flower frogs are often used as an alternative to floral foam, which is typically single-use. Reusable tools allow stems to remain in water while providing mechanical support.
Environmental organizations such as the United Nations Environment Programme have highlighted concerns around plastic waste and microplastics:
https://www.unep.org/plastic-pollution
Choosing reusable arranging tools is one way many florists and gardeners are adapting their practices.
Final Thoughts
Choosing the right flower frog doesn’t require complicated tools or expertise. By starting with your vase, understanding the different types, and selecting the appropriate size, you can create stable, natural-looking arrangements with confidence.
For beginners, simple grid-style frogs or vases with built-in support structures are often the easiest place to start. With a little practice, flower frogs become an intuitive and flexible tool for everyday flower arranging.
Flower Frog vs. Floral Foam: Which Is Better for Flower Arranging?
Flower Frog vs. Floral Foam: Understanding the Difference
When creating floral arrangements, the mechanics used to hold stems in place play a major role in both the design and the environmental impact of the arrangement. Two of the most common options are floral foam and flower frogs. While both serve a similar purpose—stabilizing stems—they function very differently and offer distinct advantages depending on the situation.
What Is Floral Foam?
Floral foam is a lightweight, porous material designed to hold water and secure flower stems. It is typically soaked in water before use, allowing stems to be inserted directly into the foam for hydration and support.
Floral foam is widely used in event floristry and large installations because it allows for quick construction of structured arrangements. However, it is generally considered a single-use material.
What Is a Flower Frog?
A flower frog is a reusable tool placed inside or on top of a vase to hold stems in position. Instead of inserting stems into a solid block, each stem is supported mechanically while remaining in open water.
Flower frogs come in several forms, including pin-style (kenzan), grid or cage designs, and vases with built-in frog structures. They are often used for smaller arrangements, garden-style designs, and everyday floral arranging.
Key Differences Between Flower Frogs and Floral Foam
1. Sustainability
One of the biggest differences between floral foam and flower frogs is environmental impact.
Floral foam is typically made from petroleum-based materials and is not biodegradable. When cut or handled, it can break into small particles that contribute to microplastic pollution.
Flower frogs, on the other hand, are reusable tools that can be used repeatedly over time. Because they do not break down into particles during use, they are often considered a more sustainable option. Our EcoFloral flower frogs are completely biodegradable in all environments and can be used time and time again when cleaned thoroughly in the dishwasher.
Organizations such as the United Nations Environment Programme have highlighted the growing concern around plastic pollution and microplastics:
https://www.unep.org/plastic-pollution
2. Ease of Use
Floral foam is often considered easier for beginners because stems can be inserted quickly and will stay in place immediately. Here at EcoFloral, we believe our flower frogs and flower frog vases are just as easy to use! Stems are inserted into pre-designed holes and can balance in place. No additional supplies, like chicken wire, putty, or tape, are needed.
3. Flexibility and Adjustments
Floral foam holds stems firmly in place once inserted, which can make adjustments more difficult. Removing and repositioning stems may weaken the structure of the foam.
Flower frogs allow stems to be repositioned easily at any stage. This flexibility is especially useful when working with garden flowers that shift as they open. The holes remain the same size no matter how many times flowers are placed and removed.
4. Longevity and Cost
Floral foam is typically single-use and must be replaced for each arrangement.
Most flower frogs and flower frog vases are reusable and can last for years with proper care. Over time, this can make them a more cost-effective option for frequent flower arranging. Our EcoFloral frogs and vases last for years and can be washed in the dishwasher to ensure proper cleaning.
Are Flower Frogs a Replacement for Floral Foam?
Rather than being a direct replacement in every situation, flower frogs offer an alternative approach to arranging flowers. Many florists and home gardeners are increasingly incorporating reusable tools like flower frogs into their work, especially for smaller arrangements and everyday use.
As interest in sustainability grows, there is increasing awareness of the materials used in floral design and their long-term impact.
Final Thoughts
Both floral foam and flower frogs serve the same basic purpose—holding stems in place—but they differ significantly in how they function, how they are used, and their environmental impact.
For those looking for a reusable, sustainable, and flexible approach to flower arranging, flower frogs offer a practical alternative. For highly structured or large-scale designs, floral foam may still have a role.
Understanding the strengths and limitations of each option allows florists and gardeners to choose the right tool for their specific needs.
What Is PHA? A Guide to Sustainable Materials for Flower Vases and Garden Products
What Is PHA?
PHA (polyhydroxyalkanoate) is a plant-based biopolymer produced by microorganisms through the fermentation of renewable resources such as plant sugars and oils. Unlike conventional plastics derived from petroleum, PHA is created using biological processes, making it part of a newer category of materials designed to reduce long-term environmental impact.
PHA has gained attention in recent years as interest grows in alternatives to traditional plastics for products like packaging, medical materials, and consumer goods.
How PHA Is Different from Traditional Plastics
Most common plastics, such as ABS and PETG, are made from fossil fuels and can persist in the environment for decades or longer. Over time, these materials can break into smaller particles known as microplastics, which are difficult to remove from ecosystems.
PHA differs in two important ways:
It is derived from renewable plant-based inputs
It is designed to break down more naturally under certain environmental conditions
Because of this, PHA is often studied as a potential alternative to petroleum-based plastics in applications where reducing long-term material persistence is important.
PHA vs PLA: What’s the Difference?
PLA (polylactic acid) is another plant-based plastic commonly used in 3D printing and consumer products. While PLA is often marketed as biodegradable, it typically requires industrial composting facilities with controlled heat and humidity to break down efficiently.
PHA is distinct in that it can biodegrade in a wider range of environments, including soil and marine conditions, depending on the specific formulation and conditions. This difference is one reason PHA is being explored more heavily for applications where environmental exposure is likely.
Biodegradability and Environmental Considerations
No material is completely impact-free, and biodegradability depends on environmental conditions such as temperature, moisture, and microbial activity. However, PHA is one of the few materials currently available that has demonstrated the ability to break down more naturally compared to many conventional plastics.
Organizations such as the United Nations Environment Programme have highlighted the growing concern around plastic pollution and microplastics:
https://www.unep.org/plastic-pollution
Materials like PHA are being studied as part of broader efforts to reduce long-term plastic accumulation in ecosystems.
Why PHA Is Used in Vases, Planters, and Garden Tools
For products like flower vases, planters, and soil blocking tools, materials need to balance durability with environmental considerations.
PHA offers several functional advantages:
Structural strength for everyday use
Water resistance for holding flowers and plants
Lightweight properties for easy handling
Compatibility with modern manufacturing methods like 3D printing
These characteristics make it suitable for reusable home and garden products that are handled frequently but do not require the extreme durability of industrial plastics.
PHA in Sustainable Product Design
Designing more sustainable products involves considering the entire lifecycle of a material, including how it is produced, used, and eventually disposed of. PHA represents one approach to reducing reliance on fossil-fuel-based plastics while maintaining product performance.
While research is ongoing and no material is a perfect solution, plant-based biopolymers like PHA are an important part of the conversation around more responsible material choices.
Final Thoughts
PHA is a plant-based material that offers a different approach to product design compared to conventional plastics. With its renewable origins and potential for broader biodegradability, it is increasingly being used in applications where sustainability is a priority.
For gardeners, florists, and environmentally conscious consumers, understanding the materials used in everyday products can help inform more thoughtful purchasing decisions.
Start Here: Sustainable Flower Arranging and Gardening Guides
Explore beginner guides to sustainable flower arranging and seed starting. Learn how to use flower frogs, arrange flowers without floral foam, and start seeds successfully with soil blocking techniques.
Welcome to EcoFloral’s resource center for sustainable gardening and flower arranging. Whether you are starting seeds indoors, arranging garden flowers, or looking for alternatives to disposable plastic tools, this guide will help you get started.
Below you’ll find our most helpful tutorials on soil blocking, flower frogs, and eco-friendly gardening techniques.
Flower Arranging Without Floral Foam
Many traditional floral arrangements rely on floral foam to stabilize stems. However, floral foam is typically made from petroleum-derived materials and is generally single-use.
Reusable mechanics such as flower frogs provide a more sustainable alternative while still allowing for beautiful, stable designs.
Start with these guides
What Is a Flower Frog? Complete Guide
Learn how flower frogs work, the different types available, and how they help create stable floral arrangements without foam.
Best Flower Frogs for Beginners
Discover the easiest flower frogs to start with and how to choose the right type for your arranging style.
How to Arrange Flowers Without Floral Foam
Step-by-step methods for creating arrangements using reusable mechanics instead of disposable foam.
Seed Starting and Soil Blocking Guides
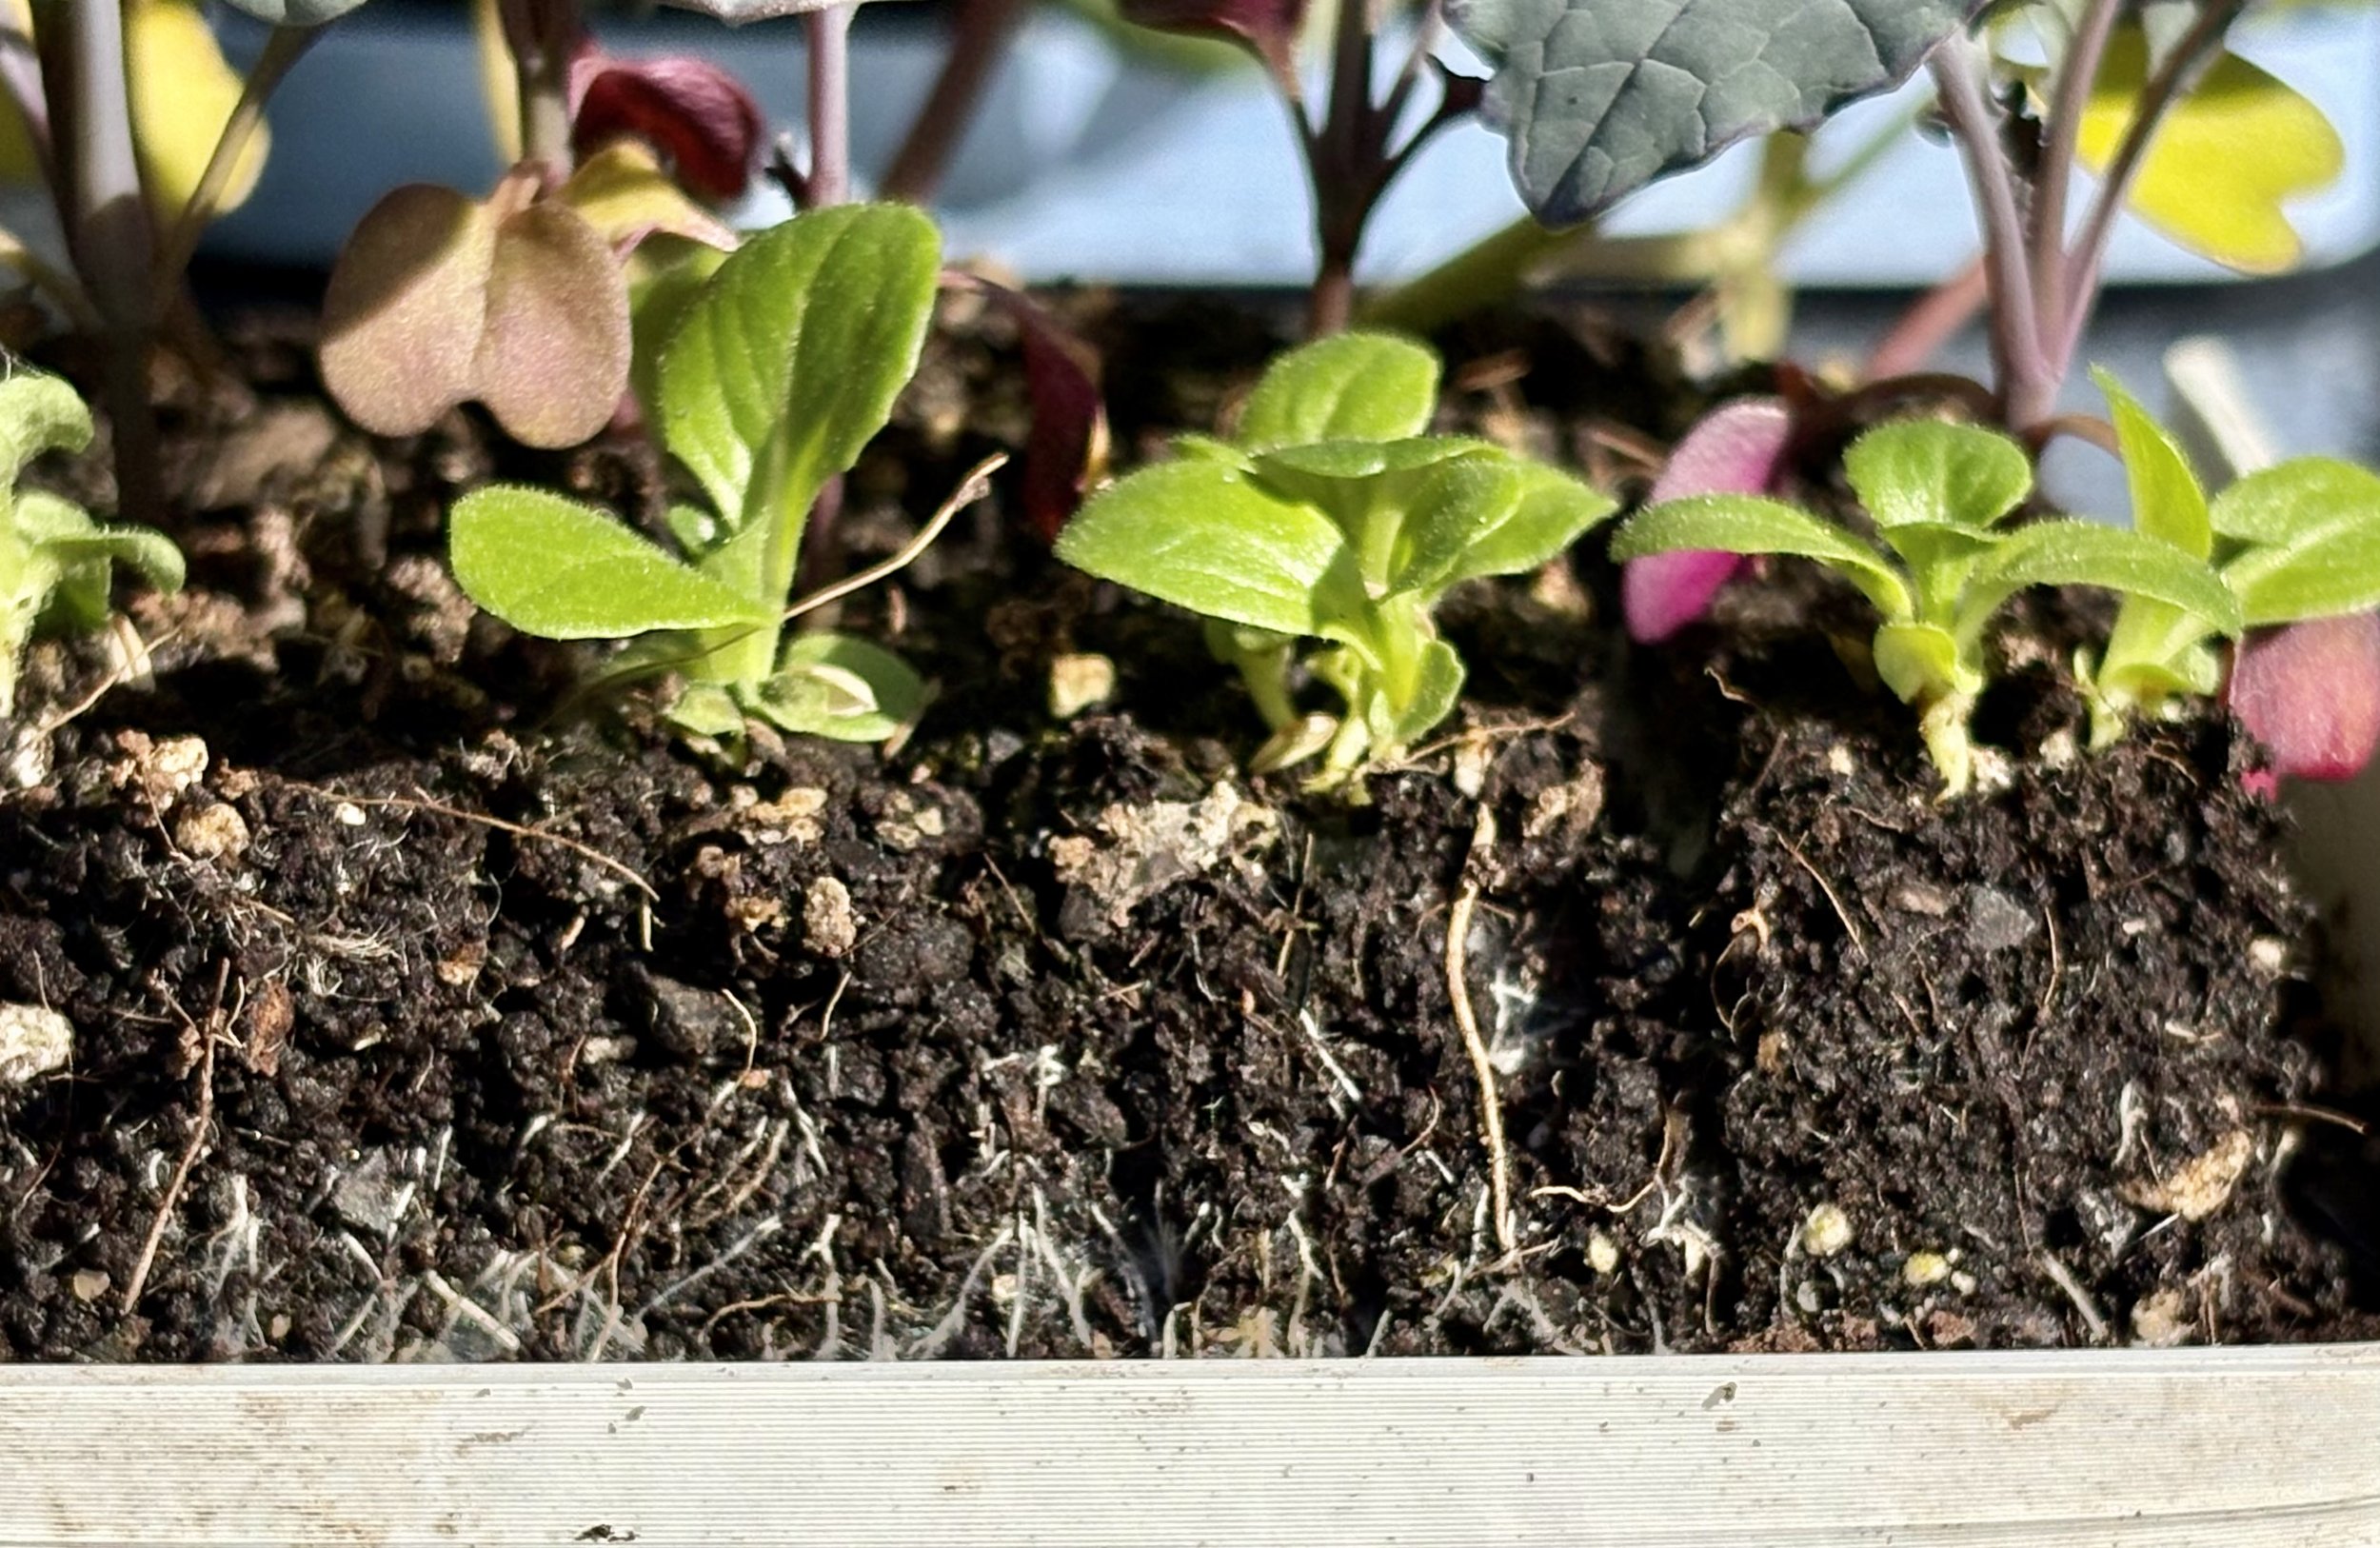
Starting seeds indoors is one of the most rewarding parts of gardening. Soil blocking is a technique that forms compressed cubes of soil instead of using plastic cell trays.
Because roots are exposed to air at the edge of the block, they naturally stop growing outward and branch instead, a process known as air pruning. Many gardeners find this can support strong root development and easier transplanting.
Start with these articles
Benefits of Soil Blocking
Learn how soil blocking can improve root development, reduce transplant shock, and reduce reliance on plastic trays.
Best Soil Blocking Tools for Beginners
A complete guide to the essential tools needed to start soil blocking successfully.
Soil Blocking Mistakes to Avoid
Common beginner mistakes and how to prevent them when starting seeds.
Sustainable Gardening Tools
EcoFloral designs reusable tools for gardeners and flower lovers who want alternatives to disposable plastics.
Explore our collections:
These tools are designed to help gardeners reduce waste while maintaining functionality and durability.
Why Sustainable Gardening Matters
Many traditional gardening and floristry tools rely on disposable plastics or single-use materials. While these products can be convenient, they often contribute to long-term environmental waste.
Reusable mechanics, durable tools, and biodegradable materials can help reduce material waste while supporting healthy plants and creative design.
For gardeners interested in environmentally conscious practices, small changes in tools and techniques can make a meaningful difference over time.
Recommended Next Guides
If you're new to these topics, start with these articles:
These guides will introduce the fundamentals of sustainable flower arranging and seed starting.
What Is a Flower Frog? Complete Guide to Types, Uses, and Flower Arranging
Discover what a flower frog is, how it works, and the different types used for floral arranging. This complete beginner guide explains how to create stable arrangements without floral foam using reusable flower frogs and sustainable techniques.
Flower frogs are one of the most effective tools for creating stable, natural-looking floral arrangements without floral foam. Although they have been used for more than a century, flower frogs are experiencing renewed interest as gardeners and designers look for reusable and sustainable arranging methods.
This guide explains what flower frogs are, how they work, and how to choose the right type for your needs.
What Is a Flower Frog?
A flower frog is a device placed inside a vase or container that holds flower stems in position. It provides structural support so stems remain upright and arranged intentionally rather than falling outward.
Unlike floral foam, which surrounds stems, a flower frog stabilizes stems mechanically while allowing them to remain in open water. This can help maintain hydration and extend the life of arrangements when proper care is used.
Flower frogs are commonly made from materials such as metal, glass, ceramic, or modern polymers.
Why Are They Called Flower Frogs?
The term “flower frog” dates back to the late 19th and early 20th centuries. One theory suggests the name comes from the frog-like shape of early designs, while another proposes it refers to the way stems “sit” on the device similar to a frog resting on a surface.
Regardless of origin, the term has remained widely used in floral design.
Types of Flower Frogs
Several types of flower frogs exist, each with different advantages depending on the arrangement style and user experience level.
Pin Frogs (Kenzan)
Pin frogs, also called kenzan, use a weighted base with upright metal pins that grip stems.
Advantages:
Strong stability
Precise stem placement
Ideal for minimalist or ikebana designs
Considerations:
Requires some technique
May not suit very soft stems
Pin frogs are commonly used in Japanese ikebana floral traditions.
Cage or Grid Frogs
Cage frogs use a wire or metal grid to hold stems in place.
Advantages:
Beginner-friendly
Works well for fuller arrangements
Flexible stem placement
These are often easier for casual home arranging than pin frogs.
Glass Flower Frogs
Vintage glass frogs were historically popular and often include holes or patterned openings to support stems.
Advantages:
Decorative appearance
Collectible designs
Simple functionality
They remain popular among collectors and hobbyists.
Integrated Flower Frog Vases
Modern designs sometimes incorporate stem-support structures directly into the vase.
Advantages:
No separate tool required
Clean aesthetic
Easy for beginners
How Does a Flower Frog Work?
Flower frogs create stability through mechanical support rather than absorbent material.
Stems are inserted:
Between pins
Through grid openings
Into structural supports
This allows stems to remain submerged in water while being held in position. Because the stems are not surrounded by foam, they can be adjusted easily during arranging.
Advantages Over Floral Foam
Traditional floral foam is typically made from petroleum-derived phenolic resin and is generally single-use. During handling, foam can fragment into small particles that contribute to microplastic waste.
Environmental organizations have raised concerns about microplastics entering ecosystems from consumer products. Information about plastic pollution impacts is available through the United Nations Environment Programme:
https://www.unep.org/plastic-pollution
Reusable flower frogs offer an alternative that can be used repeatedly without disposable waste.
When to Use a Flower Frog
Flower frogs are useful for:
Garden flower arrangements
Minimalist floral designs
Centerpieces
Everyday home decor
Event arrangements
They are particularly helpful when working with flowers that have varying stem lengths or directions.
How to Use a Flower Frog (Basic Steps)
Place the frog securely inside a container
Add clean water
Start with structural stems
Add focal flowers
Fill with supporting flowers and greenery
Rotate the container while arranging
Practice improves results quickly.
Choosing the Right Flower Frog
The best choice depends on:
Experience level
Flower types
Arrangement style
Container size
Desired appearance
Beginners often find cage frogs or integrated frog vases easiest to use.
Are Flower Frogs Beginner-Friendly?
Yes. While some designs require practice, many flower frogs are accessible to beginners. Integrated frog vases and grid-style frogs often provide the easiest starting point.
Like any creative skill, arranging becomes easier with experience.
Final Thoughts
Flower frogs provide a reusable, flexible method for arranging flowers without disposable foam. With multiple styles available, they can support both beginner and advanced floral designs while aligning with sustainable practices.
As interest in environmentally responsible floristry grows, flower frogs are becoming an increasingly popular tool for home and professional use.
How to Arrange Flowers Without Floral Foam: Sustainable Techniques That Work
Learn how to arrange flowers without floral foam using sustainable techniques like flower frogs, grids, and natural mechanics. This step-by-step guide shows how to create stable, beautiful arrangements while reducing waste with reusable floral tools.
Floral foam has been widely used in floristry for decades because it stabilizes stems and holds water. However, concerns about environmental impact and microplastic pollution have encouraged many gardeners and designers to explore alternative methods.
Fortunately, it is entirely possible to create beautiful, stable arrangements without floral foam using reusable mechanics and simple techniques.
Why Avoid Floral Foam?
Traditional floral foam is typically made from phenolic resin, a petroleum-derived plastic material. When cut or handled, foam can break into small particles that enter the environment.
Environmental research has highlighted growing concerns about microplastics in ecosystems and water systems. The United Nations Environment Programme provides an overview of plastic pollution impacts here:
https://www.unep.org/plastic-pollution
Because floral foam is generally single-use and not biodegradable, many florists are transitioning to reusable alternatives.
Sustainable Alternatives to Floral Foam
Several effective mechanics can replace foam:
Flower Frogs
Flower frogs hold stems in place using pins, grids, or structural supports.
Advantages:
Reusable
Durable
Natural-looking arrangements
Minimal waste
Tape Grids
Waterproof floral tape can create a grid across a container opening.
Advantages:
Simple
Inexpensive
Good for lightweight stems
Chicken Wire or Mesh
Wire mesh provides flexible stem support for larger arrangements.
Advantages:
Reusable
Adaptable
Suitable for full bouquets
Branch Structures
Twigs or branches inside a vase can create natural stem support.
Advantages:
Fully natural
Sustainable
Artistic appearance
Step-by-Step Foam-Free Arrangement Method
Choose a container with a wide opening
Add a flower frog or grid structure
Fill with clean water
Start with structural stems
Add focal flowers
Fill gaps with secondary flowers
Rotate while arranging
This process creates stable designs without foam.
Benefits of Foam-Free Arranging
Many people notice additional advantages:
Longer-lasting flowers
Cleaner water
Easier stem adjustment
Reduced waste
Because stems remain directly in water, hydration can sometimes improve compared to foam-based arrangements.
Final Thoughts
Arranging flowers without floral foam is both achievable and practical. With tools like flower frogs, grids, and natural mechanics, gardeners and designers can create stable, beautiful arrangements while reducing disposable materials.
As awareness of sustainability grows, reusable arranging methods are becoming increasingly popular for both home and professional use.
Best Flower Frogs for Beginners: How to Choose the Right One
Discover the best flower frogs for beginners, including pin frogs, cage frogs, and modern flower frog vases. Learn how to choose the right type for stable, beautiful arrangements without floral foam using reusable, sustainable tools that help flowers last longer.
Best Flower Frogs for Beginners: How to Choose the Right One
Flower frogs are one of the most effective tools for creating stable, natural-looking floral arrangements without floral foam. While they have been used for over a century, interest in flower frogs has grown recently as gardeners and florists look for reusable and sustainable arranging methods.
For beginners, understanding the different types of flower frogs and how they function can make arranging significantly easier.
What Is a Flower Frog?
A flower frog is a device placed inside a container - or in our case printed as part of the container - that holds stems in position, allowing flowers to stand upright and maintain structure. Unlike floral foam, which surrounds stems, a flower frog provides mechanical support while leaving stems exposed to water.
Types of Flower Frogs
Several styles exist, each suited to different arranging needs.
Pin Frogs (Kenzan)
Pin frogs use a weighted base with upright metal pins that grip stems.
Advantages:
Excellent stability
Precise placement control
Ideal for minimalist or ikebana-style designs
Considerations:
Requires some practice
Not ideal for very soft stems
Pin frogs are widely used in Japanese ikebana floral design traditions.
Cage or Grid Frogs
Cage frogs use a grid or wire structure to hold stems.
Advantages:
Beginner-friendly
Good for fuller arrangements
Flexible stem positioning
These are often easier for casual home use than pin frogs.
Integrated Flower Frog Vases
Some modern vases include built-in stem support structures.
Advantages:
Simplifies arranging
No separate tools required
Cleaner appearance
Beginner-friendly
Integrated designs are especially helpful for people new to floral arranging.
How to Choose the Right Flower Frog
The best choice depends on several factors:
Skill Level
Beginners often benefit from:
Cage frogs
Pin frogs may require more technique.
Flower Types
Thick stems → pin frogs work well
Mixed bouquets → cage frogs are easier
Garden flowers → integrated frogs are convenient
Arrangement Style
Minimalist → pin frogs
Full bouquets → cage frogs
Everyday home use → integrated frog vase
Advantages Over Floral Foam
Many gardeners are moving away from floral foam because it is typically made from petroleum-based phenolic resin and breaks into microplastic fragments during use.
Environmental organizations have raised concerns about microplastic pollution in consumer products, including floristry materials. Information about plastic pollution impacts can be found through the United Nations Environment Programme:
https://www.unep.org/plastic-pollution
Reusable flower frogs provide an alternative that can be used repeatedly without generating disposable waste.
Beginner Tips for Success
For best results:
Use fewer stems than you think you need
Start with sturdy flowers
Insert stems at angles
Rotate the container while arranging
Practice with garden clippings
Like any skill, arranging improves quickly with practice.
Final Thoughts
Flower frogs offer a reusable, flexible method for creating stable floral arrangements without disposable foam. With several types available, beginners can choose tools that match their experience level and desired style.
Whether using a traditional pin frog or a modern integrated vase, flower frogs can make arranging more accessible while supporting sustainable practices.
Best Soil Blocking Tools for Beginners: Complete Starter Guide
Discover the best soil blocking tools for beginners, including blockers, trays, soil mixes, and watering methods for successful seed starting. This complete guide explains what you need to start soil blocking, grow healthier seedlings, and reduce plastic use with a simple, reusable system.
Soil blocking is an increasingly popular method for starting seeds without plastic trays. By forming compressed cubes of soil instead of using containers, gardeners can grow seedlings with healthier root systems and reduced transplant shock. However, getting started successfully depends on having the right tools.
This guide explains the essential soil blocking tools beginners need, how each one works, and how to choose the best setup for your growing space.
What Is Soil Blocking?
Soil blocking uses a handheld tool called a soil blocker to compress moist seed-starting mix into firm cubes that hold their shape without containers. Seeds are planted directly into the blocks, which are typically placed in a tray for support and bottom watering.
Because roots are exposed to air at the edges of the block, they naturally stop growing outward and branch instead — a process known as air pruning. Healthy root development is widely recognized as important for transplant success and plant vigor, as discussed by the Journal of Experimental Botany:
https://doi.org/10.1093/jxb/erad488
Essential Soil Blocking Tools
1. Soil Blocker Tool
The soil blocker itself is the most important piece of equipment. These tools compress soil into uniform blocks and create small indentations for seeds.
Common sizes include:
Mini blocks (¾ inch) for small seeds
Micro blocks for dense seed starting
Standard 2-inch blocks for vegetables and flowers
Larger blocks for potting up seedlings
Beginners often start with mini or 2-inch blockers depending on their crops.
2. Solid Bottom Tray
Soil blocks need a stable tray underneath for support and watering. Trays that enable bottom watering are ideal because they maintain even moisture levels and reduce disturbance to seedlings.
Using sturdy trays designed for soil blocks can simplify watering and improve organization.
3. Seed Starting Mix
Soil blocking requires a fine, moisture-retentive mix that holds together when compressed. Many growers use mixes containing:
Peat or coco coir
Compost
Fine vermiculite or perlite
Nutrient amendments
The correct moisture level is critical — the texture should resemble wet brownie batter, so the blocks hold their shape.
4. Watering System
Bottom watering is one of the main advantages of soil blocking. Water is added to the tray, allowing blocks to absorb moisture from below through capillary action.
A small watering can with a gentle rose head is also useful for occasional top watering without disturbing seeds.
Consistent moisture is essential for germination success.
5. Humidity Dome or Cover
During germination, seeds benefit from consistent humidity. Many growers use humidity domes, plastic covers, or even repurposed containers to maintain moisture until seedlings emerge.
Covers should be removed once sprouts appear to prevent disease issues.
6. Grow Lights or Bright Light Source
After germination, seedlings need strong light immediately. Insufficient light causes weak, leggy growth.
Options include:
LED grow lights
Fluorescent shop lights
Bright south-facing windows (for small setups)
Lighting is often one of the most important success factors.
Optional but Helpful Tools
These items are not required but can improve efficiency:
Heat mats for warm-season crops
Seed dibblers or tweezers for small seeds
Labels for organization
Spray bottles for humidity control
Larger trays for potting up
As your system grows, these tools can add convenience.
Sustainability Benefits of Soil Blocking
One reason many gardeners choose soil blocking is the reduction in plastic use. Traditional seed trays are often made from thin plastics that degrade over time and require replacement. EcoFloral seed trays are made with a biodegradable biopolymer and low-carbon footprint manufacturing, adhering to the highest standards of sustainability.
Soil blocking systems typically rely on reusable tools and trays, which can reduce material waste over multiple seasons. The environmental impact of plastics in consumer products is an area of ongoing research, with information available from the U.S. Environmental Protection Agency:
https://www.epa.gov/plastics
While no gardening system is completely impact-free, soil blocking can reduce reliance on disposable plastics.
Beginner Tips for Success
For best results:
Use the correct soil moisture level
Provide strong light after germination
Bottom water consistently
Maintain humidity during sprouting
Start with easy crops
Many beginners find soil blocking becomes easier after the first few attempts.
Choosing the Right Setup
The best soil blocking setup depends on:
Number of plants you want to grow
Available space
Budget
Crop types
Lighting conditions
Starting simple is often the best approach. A soil blocker, tray, quality soil mix, and good lighting are enough for most beginners.
Final Thoughts
Soil blocking offers a flexible, reusable alternative to traditional seed trays. With the right tools and basic technique, gardeners can grow healthy seedlings with strong root systems and minimal plastic waste.
For beginners interested in improving seed starting success while adopting more sustainable practices, soil blocking is an effective method worth exploring.

Soil Blocking Mistakes to Avoid: Beginner Guide for Healthy Seedlings
Avoid common soil blocking mistakes like crumbling blocks, poor germination, and uneven watering. This beginner guide explains how to improve moisture, soil mix, lighting, and trays for healthy seedlings and successful seed starting.
Soil blocking is one of the most effective ways to start seeds without plastic trays, but beginners often run into challenges when learning the technique. Problems like crumbling blocks, poor germination, or uneven moisture usually come down to a few common mistakes.
The good news is that soil blocking is easy to master once you understand the fundamentals. This guide explains the most common soil blocking mistakes and how to avoid them so you can grow strong, healthy seedlings.
1. Using the Wrong Soil Mix
One of the biggest mistakes is using standard potting soil. Soil blocking requires a fine, well-blended mix that holds together when compressed.
A good soil blocking mix should:
Contain fine particles
Hold moisture well
Include compost or peat/coco coir
Provide nutrients for early growth
If blocks fall apart easily, the mix is usually the problem. Popular soil blocking mixes include Vermont Compost Fort Vee potting mix and our personal favorite, Fox Farms Coco-Loco potting mix. Fox Farms Coco-Loco is also peat-free, making it an eco-friendly choice for seed starting.
2. Incorrect Moisture Level
Moisture is critical for forming solid blocks.
Too dry → blocks crumble
Too wet → blocks slump and lose shape
The ideal consistency is similar to brownie batter — wet enough to stick together when squeezed. You will want your soil blocking mix to be wetter than you would use in typical seed starting trays to enable the blocks to stay together.
3. Not Compressing Blocks Firmly Enough
Proper compression creates stable blocks that hold together during watering and handling.
Press the blocker firmly into the soil mix and scrape off excess to form clean edges. Weak compression leads to fragile blocks. Most soil blockers make it easy to compress your blocks firmly, but don’t worry about using some muscle!
4. Letting Blocks Dry Out
Soil blocks can dry faster than plastic cells because they are exposed on all sides.
Consistent moisture is essential, especially during germination. Bottom watering helps maintain even hydration without disturbing seeds.
Using sturdy trays designed for soil blocks makes watering much easier.
5. Overwatering
While drying out is a problem, overwatering is also common.
Soil blocks should be moist — not soaked. Excess water can cause:
Poor oxygen levels
Weak roots
Mold or algae growth
Allow blocks to absorb water from the bottom and avoid flooding.
6. Starting Seeds Too Early
Because soil blocks encourage rapid root growth, seedlings may outgrow blocks faster than expected.
Timing matters. Start seeds based on your planting schedule so plants are ready to transplant when conditions are right.
7. Poor Lighting After Germination
Once seeds sprout, they need strong light immediately. You don’t need special lighting to grow healthy seedlings - most traditional shop lights will work fine.
Insufficient light causes:
Leggy seedlings
Weak stems
Slow growth
Grow lights placed close to plants or bright natural light are essential for success - just make sure you don’t burn your seedlings when using lights that give off heat.
8. Skipping Humidity During Germination
Seeds germinate best with consistent humidity.
Many growers use humidity domes or covers during early stages. Remove covers once seedlings emerge to prevent disease. Another popular way to add humidity during germination is to cover the seedlings with wide-weave burlap fabric. This plastic-free option also allows more air flow during germination than typical humidity domes.
9. Not Using the Right Tray
A proper tray supports blocks, simplifies watering, and keeps seedlings organized.
Look for trays that:
Have solid bottoms
Allow bottom watering
Fit your blocker size
Provide durability and reusability
Are made with sustainable materials
Well-designed trays reduce many beginner problems.
10. Giving Up Too Quickly
Soil blocking has a small learning curve, and the first batch may not be perfect.
Most gardeners find that after one or two attempts, the process becomes faster and easier than traditional seed trays.
Practice builds confidence quickly.
Tips for Soil Blocking Success
Use a quality seed starting mix
Maintain consistent moisture
Provide strong light early
Bottom water regularly
Choose sturdy trays for support
Follow planting timelines
These fundamentals lead to healthier seedlings and better transplant success.
Final Thoughts
Soil blocking offers major benefits over traditional seed trays, including healthier roots, reduced transplant shock, and less plastic waste. Avoiding common beginner mistakes makes the process much easier and more rewarding.
With a little practice, soil blocking can become one of the most efficient and sustainable ways to start seeds.
Benefits of Soil Blocking: A Better Way to Start Seeds Without Plastic Trays
Discover the benefits of soil blocking compared to traditional seed trays, including healthier root systems, reduced transplant shock, and less plastic waste. This guide explains why gardeners and flower farmers are switching to soil blocks for stronger seedlings, better moisture control, and more sustainable seed starting success.
Soil Blocking vs Seed Trays: Why Soil Blocking Can Improve Seed Starting Success
Starting seeds indoors is one of the most rewarding parts of gardening, but the method you choose can significantly influence plant health, transplant success, and long-term efficiency. Traditional plastic cell trays have been widely used for decades, but many gardeners and flower farmers are increasingly adopting soil blocking, a technique that forms compressed cubes of soil instead of using individual containers.
So what makes soil blocking different — and why do many growers consider it an improvement over conventional seed trays?
What Is Soil Blocking?
Soil blocking is a seed starting method that uses a hand tool called a soil blocker to compress moist seed-starting mix into firm blocks. Seeds are planted directly into these blocks, which hold their shape without requiring plastic containers.
The blocks are typically placed in a tray for support and bottom watering, creating a flexible and reusable seed starting system.
Healthier Root Systems
One of the most frequently cited benefits of soil blocking is improved root development.
In traditional plastic cells, roots grow until they encounter the container wall, where they often begin circling. This can contribute to root binding and reduced transplant performance. In soil blocks, roots are exposed to air at the block surface, which naturally stops tip growth and encourages branching — a process known as air pruning.
Healthy root architecture is widely recognized as important for transplant success and plant vigor. Scientific research from the Journal of Experimental Botany discusses the importance of root structure in seedling development:
https://doi.org/10.1093/jxb/erad488
Because soil blocks encourage branching root systems rather than circling roots, seedlings often establish more quickly after transplanting.
Reduced Transplant Shock
Seedlings grown in plastic cells can experience stress when removed from containers, particularly if roots are tightly bound or disturbed during transplanting.
Soil blocks minimize root disturbance because the entire block is transplanted directly into the soil. Gardeners often observe:
Faster establishment after planting
Less wilting
More consistent early growth
While results vary depending on crop and conditions, minimizing root disturbance is a widely accepted horticultural principle.
Reduced Plastic Use
Traditional seed trays are commonly made from thin petroleum-based plastics that degrade or crack after repeated use. Over time, replacing these materials can contribute to plastic waste.
Soil blocking reduces reliance on disposable plastic containers. Many growers combine soil blocks with durable, reusable trays, creating a longer-lasting system that aligns with sustainable gardening goals.
Reducing plastic waste in horticulture is an increasing area of interest in environmental research.
Moisture Control and Bottom Watering
Soil blocks absorb water from below through capillary action, which can promote even moisture distribution when properly managed. Consistent moisture is important for seed germination and early root development.
Bottom watering also reduces disturbance to seeds compared with overhead watering. However, maintaining appropriate moisture still requires attention, as soil blocks can dry faster than enclosed plastic cells if environmental conditions are not controlled.
Using stable trays designed for soil blocks can help maintain consistent hydration and simplify watering routines.
Efficient Use of Growing Space
Because soil blocks do not require rigid cell dividers, they can be arranged closely together. This flexibility allows growers to maximize limited space under grow lights or in greenhouses.
For gardeners starting large numbers of seedlings, space efficiency can be a meaningful advantage.
Cost Considerations Over Time
Soil blockers require an initial investment, but some growers find long-term costs decrease because they no longer need to repeatedly purchase disposable trays or inserts.
Additionally, smaller soil blocks may use less growing medium per plant compared to traditional containers, depending on the system used.
Economic benefits vary by scale, but durability and reusability are often cited advantages.
Sustainability Considerations
For gardeners seeking environmentally responsible methods, soil blocking offers several potential sustainability benefits:
Reduced dependence on disposable plastics
Compatibility with biodegradable materials
Efficient use of growing media
While soil blocking is not entirely impact-free — soil mixes, water, and inputs still carry environmental costs — it can reduce certain forms of material waste compared with single-use systems.
Limitations and Learning Curve
Despite its advantages, soil blocking is not necessarily the best method for every situation.
Some considerations include:
Requires proper soil moisture and technique
Blocks can dry out more quickly in low-humidity environments
Initial setup may feel unfamiliar for beginners
Very large seedlings may require potting up
Understanding these factors helps gardeners choose the most appropriate method for their needs.
Is Soil Blocking Right for Beginners?
Although there is a learning curve, many beginners successfully adopt soil blocking after a few attempts. Educational resources from experienced growers can be helpful when starting out.
Practical tutorials are available from growers such as The Gardener’s Workshop:
https://thegardenersworkshop.com/
With practice, many gardeners find soil blocking becomes efficient and straightforward.
Final Thoughts
Traditional seed trays remain widely used and effective, but soil blocking offers several potential advantages in root development, transplant success, space efficiency, and plastic reduction. By encouraging branching root systems and minimizing transplant disturbance, soil blocking can support healthy seedling growth when implemented correctly.
For gardeners interested in improving seed starting success while reducing reliance on disposable plastics, soil blocking represents a practical and increasingly popular alternative.
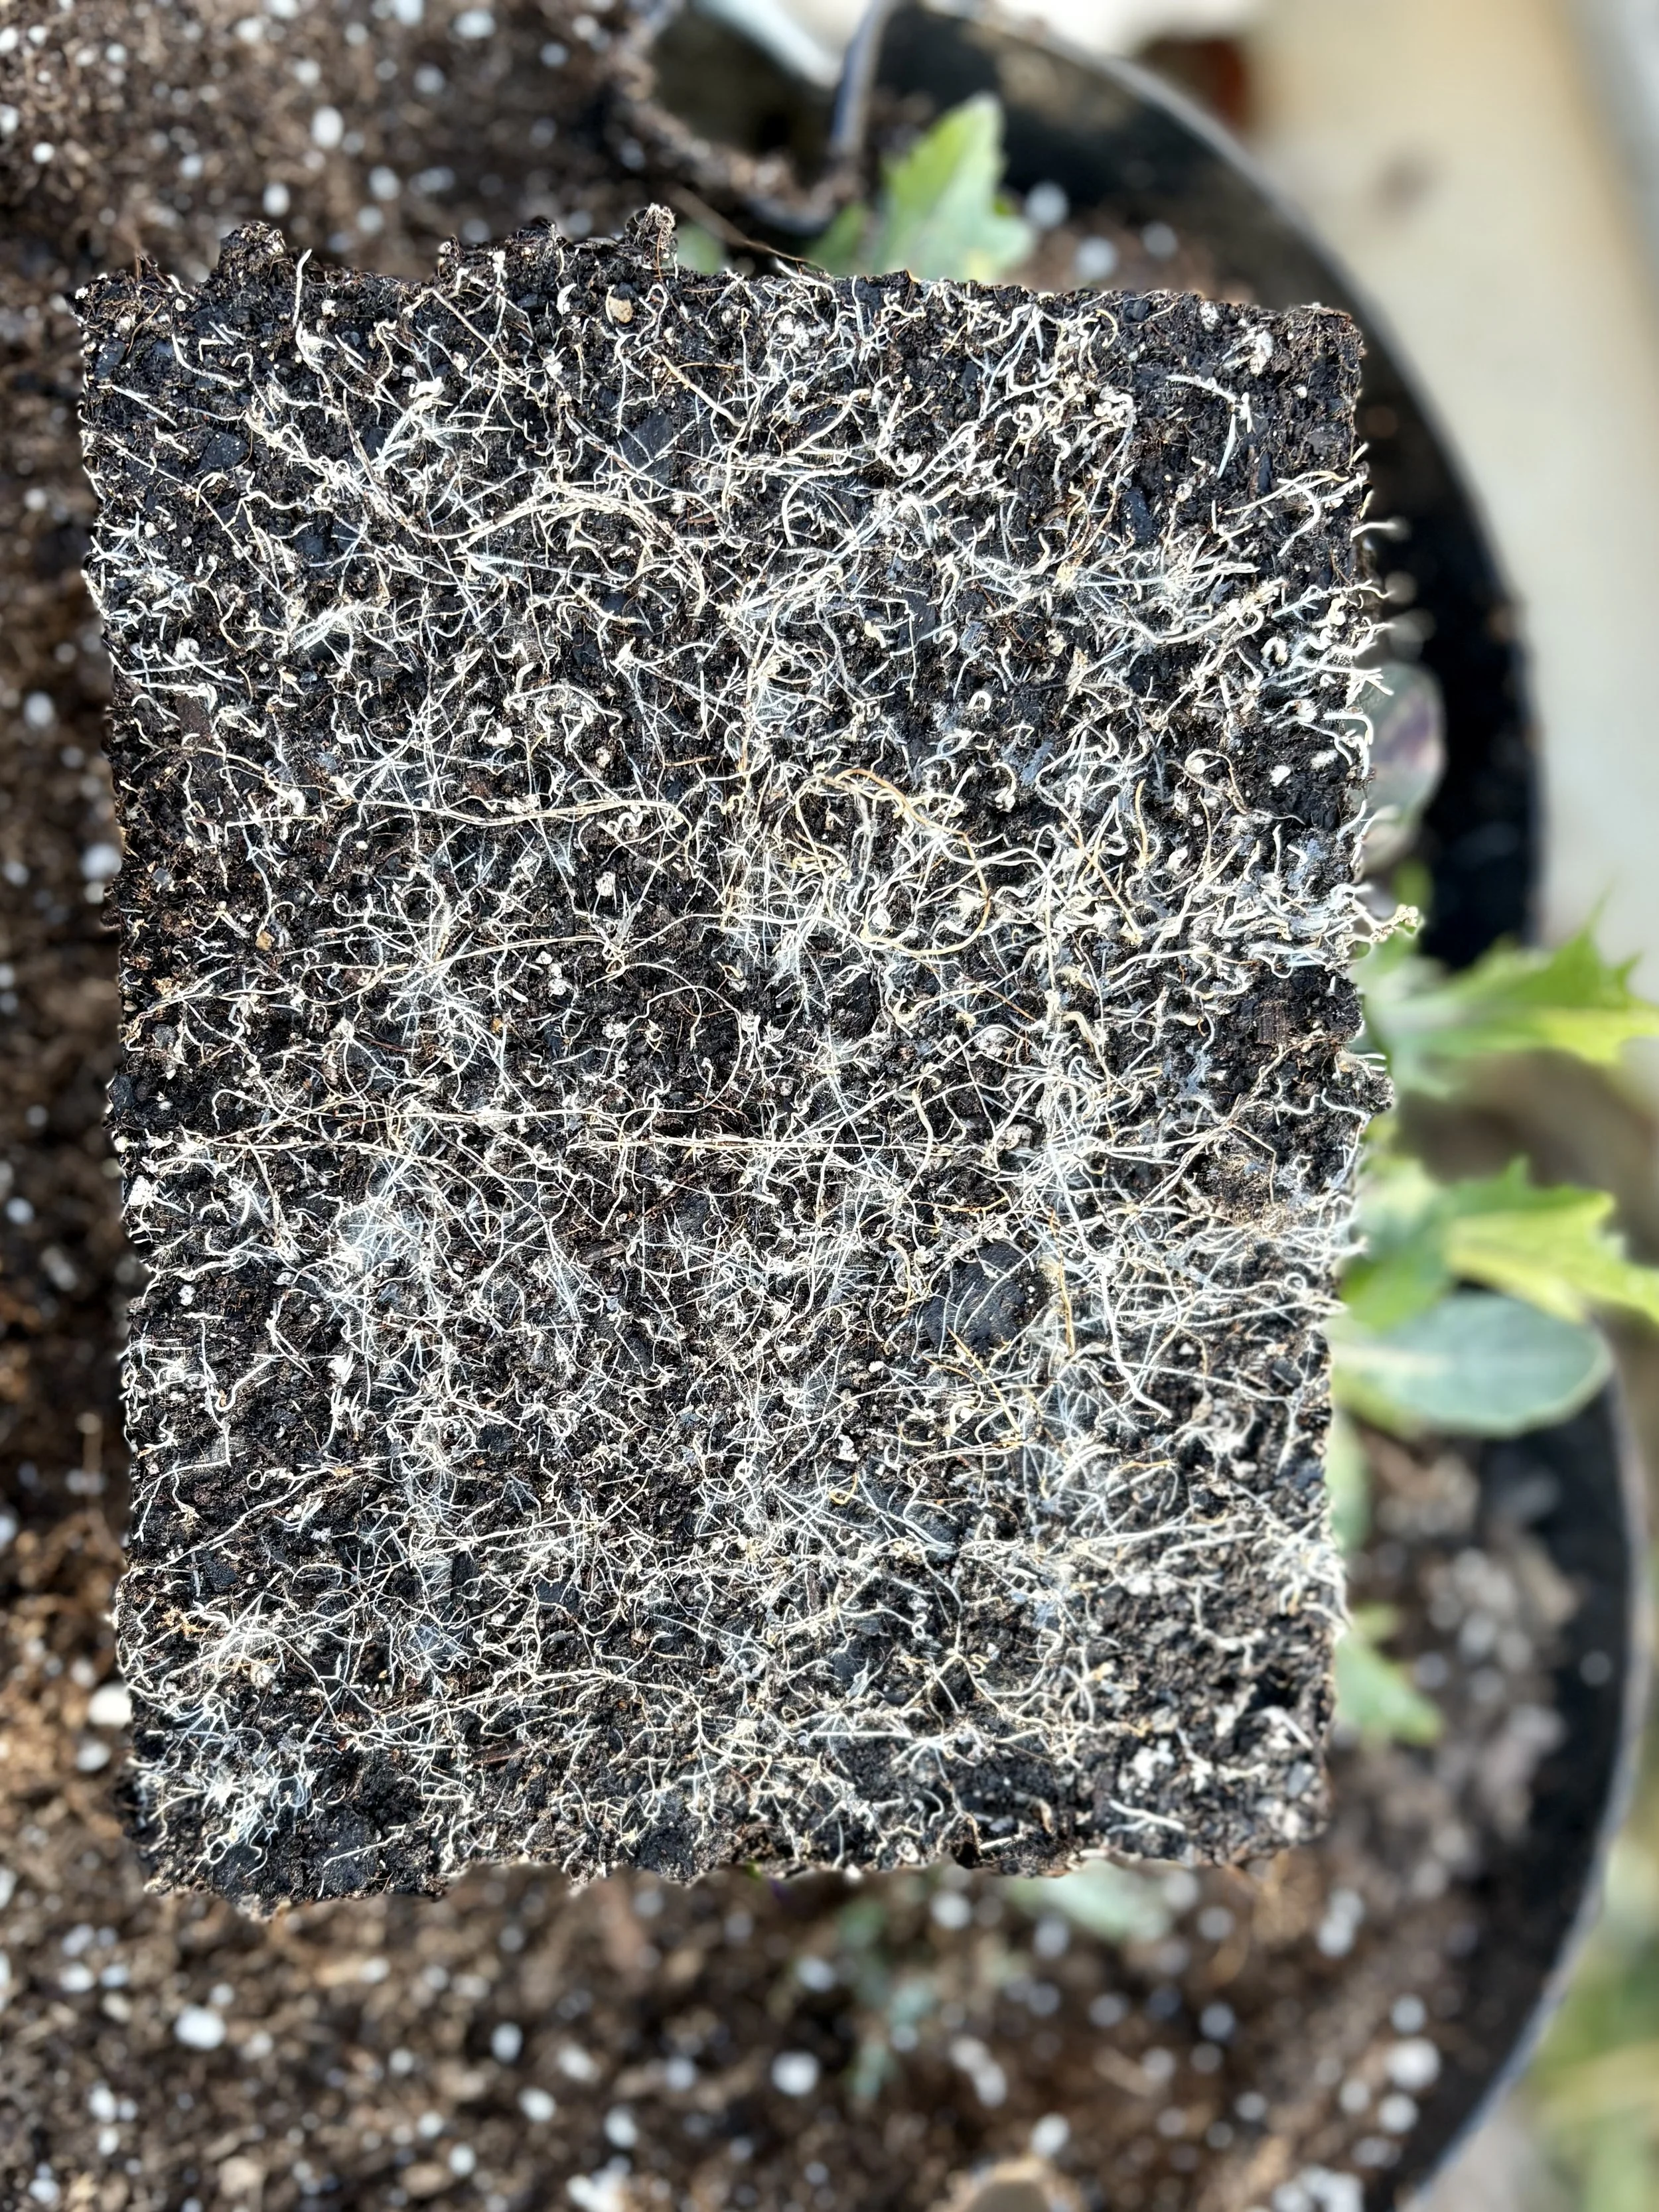
Healthy root growth on soil blocks grown in our EcoFloral Seed Trays
Why PHA Is Better Than PLA and Conventional Plastics for Sustainable Vases and 3D-Printed Products
Discover why PHA is emerging as a better alternative to PLA and traditional plastics for sustainable vases, planters, and 3D-printed products. Learn how plant-based PHA offers biodegradability, reduced microplastics, and durable performance for eco-friendly home and garden designs.
As interest in eco-friendly home decor and gardening products grows, the materials used to make everyday items are receiving more attention. Many 3D-printed products today are made from plastics such as PLA, PETG, or ABS. While these materials are practical and affordable, they differ significantly in long-term environmental impact.
A newer material called PHA (polyhydroxyalkanoate) is gaining recognition as a more sustainable alternative. Understanding how PHA compares with PLA and traditional plastics can help consumers make more informed choices when selecting vases, planters, and other household products.
What Is PHA?
PHA is a family of biopolymers produced naturally by microorganisms through fermentation of renewable resources such as plant sugars or vegetable oils. Because it comes from biological processes rather than fossil fuels, PHA is considered a biobased plastic.
One of the most important differences between PHA and conventional plastics is how it behaves at the end of its life. Research shows that PHAs can biodegrade in multiple environments — including soil, compost, and some marine conditions.
This broader biodegradability potential makes PHA especially appealing for environmentally conscious product design.
PHA Compared to PLA
PLA (polylactic acid) is also derived from plant materials and is often marketed as biodegradable. However, PLA typically requires industrial composting facilities with high temperatures and controlled humidity to break down efficiently. In natural environments like soil or water, it can persist much longer.
By contrast, PHA’s microbial origin allows it to biodegrade more readily in a wider range of environments compared to PLA. For consumers trying to reduce long-term plastic waste, this distinction can be significant.
Advantages Over Petroleum-Based Plastics
Most conventional decorative products are manufactured using petroleum-derived plastics like ABS or PETG. These materials are durable but contribute to environmental accumulation because they break down into smaller fragments rather than fully biodegrading. Our biodegradable planters and vases are made using plant-based materials designed to reduce long-term plastic waste.
Reduced Microplastic Persistence
Microplastic pollution is now recognized as a global environmental challenge affecting ecosystems and human health. Because PHA can biodegrade into natural components such as carbon dioxide, water, and biomass, it reduces long-term microplastic persistence compared to conventional plastics.
Renewable Resource Origin
PHA production uses renewable feedstocks rather than fossil fuels, which helps reduce dependence on non-renewable resources. Our 3d printing manufacturing process further reduces the carbon footprint of our PHA vases, planters, and trays, adhering to the highest standards of sustainability.
Biodegradability in Soil and Marine Environments
PHA is one of the relatively few polymer families that can biodegrade in marine environments. This characteristic is particularly important when considering long-term environmental impact.
Performance Benefits for Vases and Planters
Sustainability does not mean sacrificing performance! PHA can provide characteristics suitable for household products, including:
Adequate strength for structural items
Water resistance for fresh flowers or plants
Compatibility with 3D printing processes
Smooth or matte finishes suitable for modern design
These qualities make PHA appropriate for applications such as 3D-printed vases, planters, and gardening tools, where both function and aesthetics are important.
Real-World Applications Beyond Home Products
PHAs are not limited to decorative items. They have been studied or used in a variety of industries, including:
Medical devices and biodegradable sutures
Agricultural films and coatings
Packaging materials
Single-use consumer products
These broader applications demonstrate the versatility and scientific interest surrounding the material.
Limitations and Considerations
While PHA offers important advantages, it is not without challenges.
Some current limitations include:
Higher production costs compared with conventional plastics
Limited global manufacturing scale
Variation in mechanical properties depending on formulation
Processing sensitivity in certain manufacturing environments
Acknowledging these factors is important for understanding both the opportunities and constraints of emerging sustainable materials.
Why Material Choice Matters for Everyday Products
Decorative items like vases and planters are often replaced due to changing styles, wear, or household moves. Choosing materials with lower environmental persistence can help reduce cumulative waste over time.
Consumers are increasingly interested in transparency around material sourcing and environmental impact. Biobased polymers such as PHA offer one approach to balancing functionality with sustainability.
The Future of Sustainable 3D Printing Materials
Advances in biotechnology and materials science continue to improve PHA production efficiency and performance characteristics. Ongoing research suggests that biopolymers may play a growing role in consumer products as industries seek alternatives to conventional plastics.
Although no material is completely without environmental impact, PHA currently offers a promising combination of renewable sourcing, biodegradability potential, and functional performance compared with many traditional plastics. For applications such as sustainable vases, biodegradable planters, and 3D-printed household products, PHA represents a meaningful step toward more environmentally responsible materials.
As awareness and technology continue to evolve, materials like PHA may play an increasingly important role in reducing plastic pollution while supporting modern design and functionality.
Author Perspective
EcoFloral works directly with plant-based biopolymers in the design and production of 3D-printed home and gardening products. Practical manufacturing experience provides insight into both the benefits and limitations of emerging sustainable materials such as PHA.